
View these instructions in PDF form: Epson P800 Inkjet Printing Instructions (PDF)
General Printer Info
Users provide their own paper and are charged $1.50 per square foot for ink usage.
Only approved inkjet papers can be used with the Epson printers. Email danges@upenn.edu if you have any questions regarding printing and would like to schedule an appointment.
The Epson P900 printer can print on a variety of cut sheet paper sizes ranging from 4.1 x 5.8 to 17 x 22 inches, as well as custom paper sizes that do not exceed a 17” width.
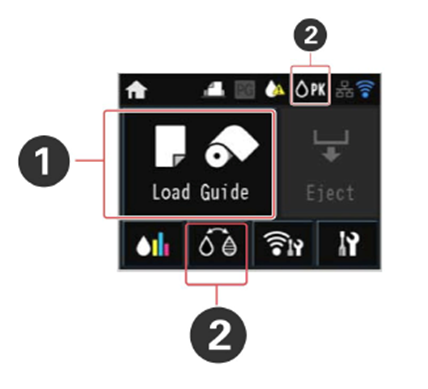
Printing a Nozzle Check
If you encounter print quality issues (drastic color/quality results or ink residue on your print), you should run a nozzle check to determine if there are any mechanical issues with the printer.
*On the printer LCD touch panel, choose the maintenance menu, select print nozzle check.
Printing a nozzle check will determine if you need to run a head cleaning cycle. If there are gaps in the printed nozzle check, you will need to run head cleaning until it clears.
*On the printer LCD touch panel, choose the maintenance menu, select print head cleaning.
Head cleans ONLY solve nozzle issues, for any other reason than blocked nozzles, see the following link: Solving Inkjet Printer Issues.
Here's a sample of a correct P800 nozzle check print - notice all the stair-step lines are present, and there's no gaps or cross contaminated colors.

How to Print
You can print on a variety of paper types and sizes from paper loaded in the sheet feeder.
1. Printer should be on, in sleep mode. If not, Power ON.
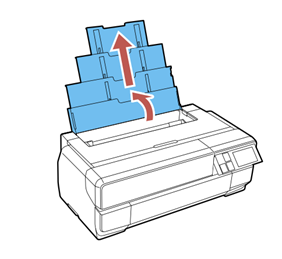
2. Open the paper support and pull up the extensions.
3. Press the front cover to open it.
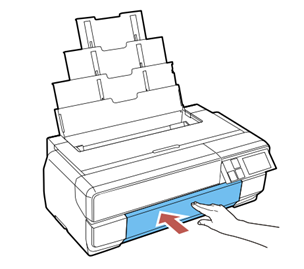
4. Fully extend the output tray.
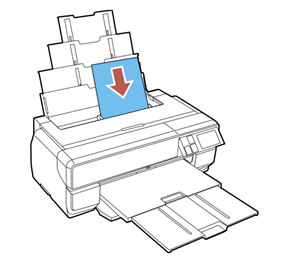
5. Insert paper, glossy or printable side up, short edge first, against the right side and beneath the tab.
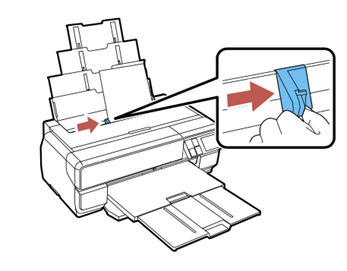
6. Press the button on the edge guide and slide it against the paper (but not too tightly).
7. When prompted by the product's LCD screen, select the size and type of the paper you loaded and select OK.
Always follow these paper loading guidelines:
- Load only the recommended number of sheets.
- Load paper short edge first, no matter which way your document faces.
- Load the printable side faceup.
- Load letterhead or pre-printed paper top edge first.
- Do not load paper above the arrow mark inside the edge guide.
- Check the paper package for any additional loading instructions.
- If larger paper does not feed correctly, flip down the paper support edge guide as shown.
Before you send your print job, check the LCD on the printer to make sure the settings are consistent with the paper you will be printing on.
1. Set printer for the correct media - “Auto Sheet Feeder” is used for most standard paper types that include luster, glossy and matte papers.
2. Make sure the correct ink is chosen for the paper type you’re using.
-For photo surface papers, such as luster or glossy, choose Photo Black (PK).
For matte surface papers, choose Matte Black (MK).
* NO NEED TO SWITCH BLACK INK IF YOUR CORRECT INK IS ALREADY SELECTED.
To switch black ink, press the black ink button, select “Proceed” and the printer will update the ink setting.
Open your file in Photoshop if you haven’t already.
➪Set Image Mode
Image > Mode > RGB Color
Choose 16 or 8 Bits/Channel

➪Set Image Size
Image > Image Size
If you uncheck “Resample,” the printing resolution will change independent of the number of pixels representing the image in width and height. Make sure your image is sized correctly (the size you want to print it) and the resolution is set to at least 300 DPI.

➪ Send to Print
Your file is now ready to print. Take care to manage the following print settings. Choose, File, Print (File > Print).

➪ Printer Setup
Choose Epson SC-P800 Series
➪ Select Print Settings
➪ Choose Paper Size:
For US Letter (8.5” x 11”) and any other paper size, select “borderless, retain size” when available.
Choose “Front” for heavy weight papers - 150+ gsm photo and fine art papers.

➪ Choose Printer Options> Printer Settings> and select the following settings:


Page Setup: Sheet Output Resolution: SuperFine- 1440 dpi
Paper Source: Sheet Feeder ⌦High Speed (turn off for matte paper)
Media Type: Choose Paper Type ⌦Finest Detail
Print Mode: Epson PrecisionDot
Color Mode: Off (No Color Management) OK, to save settings
➪Color Management Settings

After Printer Settings are saved, you’ll return to the Photoshop Printer Settings
dialogue box.
Under “Printer Setup,” Confirm how many copies you want. Printing one is suggested before making multiple copies.
Select the appropriate Layout option, depending on the orientation of your image. The preview image will
Under “Color Management,” select the following settings:
Color Handling: Photoshop Manages Colors
Printer Profile: Select appropriate paper profile
*For luster paper, I would suggest choosing cifa_P800_lustre310_p_bk.icc
⌦Send 16-bit Data
Rendering Intent- Perceptual or Relative Colorimetric
⌦Black Point Compensation
> PRINT !!