Stuart Weitzman School of Design
102 Meyerson Hall
210 South 34th Street
Philadelphia, PA 19104
Get the latest Weitzman news in your Inbox
View these instructions in PDF form: Preparing and Submitting Files for Epson Printing (PDF)
Support
Printing consultations are available Monday, Wednesday and Thursday, between 2:00-4:00pm by appointment. Please email danges@upenn.edu to confirm availability and to schedule an appointment.
Cost
Roll media: Standard paper types are available in 44” and 60” width.
Specialty media is (mostly) limited to a 44” width.
Minimum border is 0.12” (3mm), full bleed printing is unavailable.
Standard paper types include Glossy, Matte & Luster at $3.00 per square foot.
Specialty paper types include transparency materials, assorted fabrics and archival photographic papers.
These materials vary and costs range between $3.00- $7.00 per square foot.
Please schedule an appointment to see paper samples and pricing for our current inventory.
You are charged for the full width and length of the paper. Organize your files for cost effective printing.
Submission/Return Turnaround Time
Large format Epson printing occurs Monday -Thursday and requires a 48 hr turnaround time. If you are interested in running test prints, please allow for additional return time.
For example - Submit your file by 9:00am on Monday to receive your print/proof no later than Wednesday at 9:00am.
Anything submitted after 5:00 pm on Wednesday will most likely be completed for the following Monday.
Once your print is complete, you will be notified by email and can retrieve your prints outside of the Addams 001 lab.
Preparing your file for submission
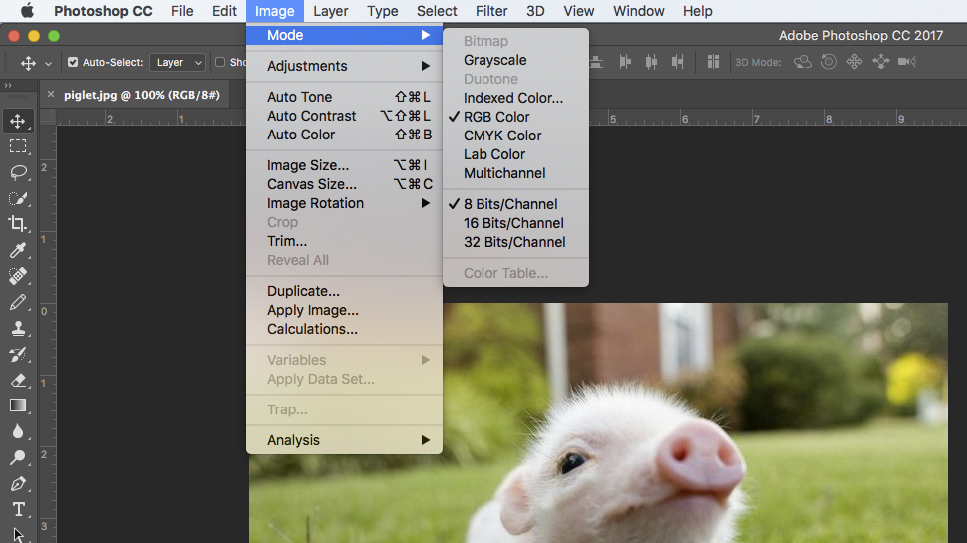
Open your file in Photoshop and set the mode to RGB Color. Image > Mode > RGB Color
If you are working with Raw files your image should be set to 16 bit. If your file is 8 bit, there is no reason to choose 16 bit.
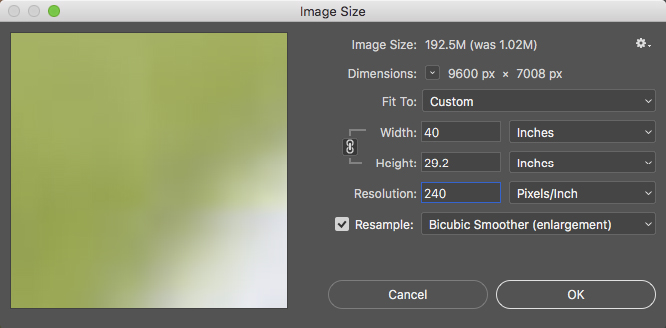
Set your file to the print size you desire, making sure the resolution is set to 300 dpi (or as close as possible)
Image > Image Size
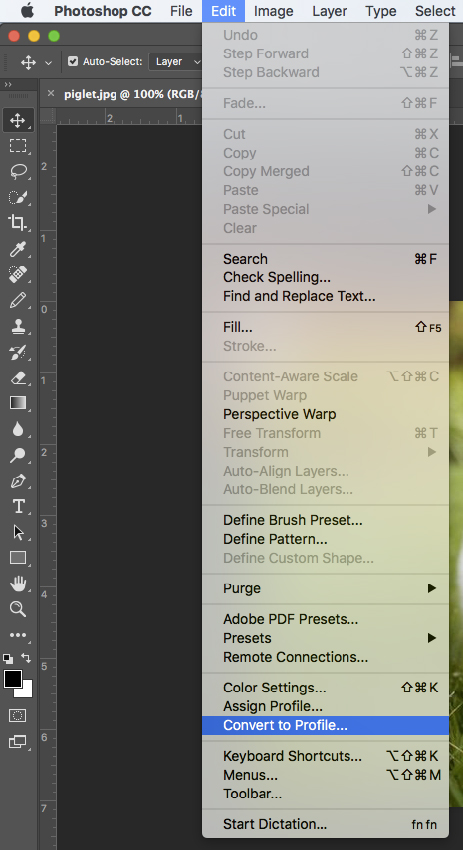
Make sure your file has the correct color profile. This should be the same as Photoshop's working space: Adobe RGB 1998.
Edit > Convert to Profile
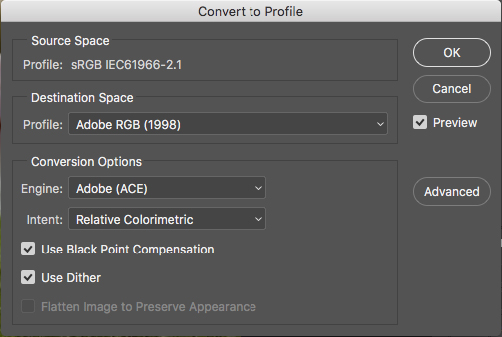
At this point, make any final corrections and flatten your image. Layer > Flatten Image
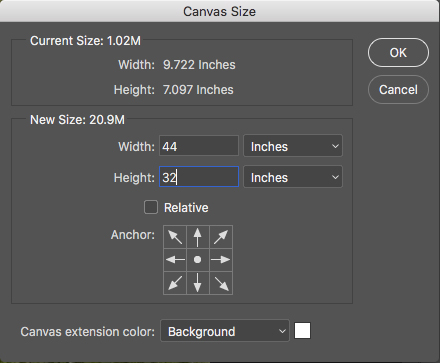
Create a canvas to match the paper size for a 44” or 60” paper width.
For example, if your image is 40” wide and 30” in height, you should create a canvas of 44” x 32” to allow a border for framing and handling the print.
Be sure to utilize the full width of the paper because you will be charged for it.
Image > Canvas Size
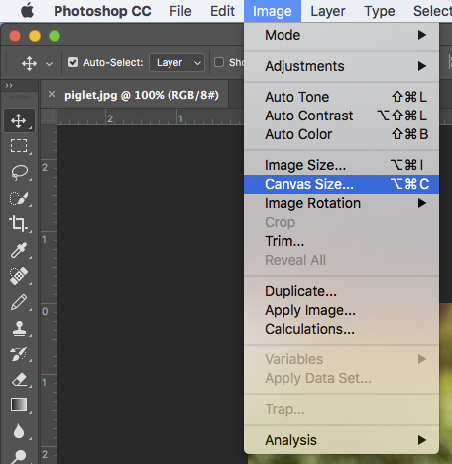
*Or, you can add multiple images to a single document. Make sure each individual image is flattened and the same DPI as the new document you are placing them onto. Drag each image onto your canvas. Organize images to share a vertical or horizontal line. This will make trimming your prints much easier.

Your file must be saved as a flattened TIFF or PSD format, and titled to your specific paper choice.
Last Name_Paper Type (G = Gossy, M = Matte, L = Luster)_Date Submitted
Example: Danges_L_05_10
*for specialty papers use an abbreviation that includes manufacturer name
Hahnemuhle Fine Art Pearl, Example: Danges_HFAP_9_20
To upload your file, Open the link below
https://upenn.box.com/s/tzykhipqzfywcbnc2ylxnc4fz0qke1es
Log in using your PennKey credentials.
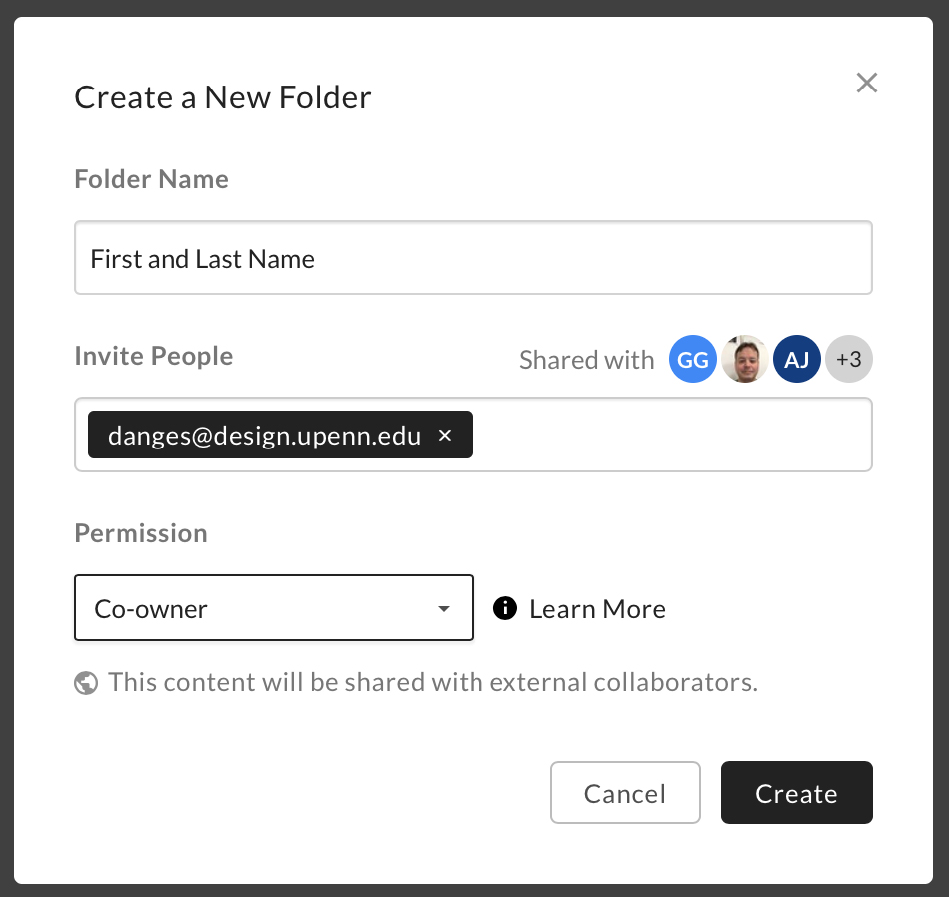
Create a New Folder
Folder Name: Your first and last name
Invite: danges@upenn.edu to share the folder
Permission: Co-owner
Drag your file into the folder and email Micah (danges@upenn.edu) to let him know that you've submitted files.
In your email, please include your PennKey username, paper preference, due date and any other important notes.
Once your job is complete, you will receive an email and can pick up your print from the storage bin, outside of the 001 Silverstein Digital Projects Lab.
